Hop Along, Harry and Sally Free E-Pattern From Linda Walsh of Linda Walsh Originals

Copyright © 2004 - 2012 - All Rights Reserved - Written By Linda Walsh 

Here's what Linda had to say about her free e-pattern:  If you're looking for a fun and easy bunny woodcraft to make for Easter my Hop Along, Harry and Sally might be perfect. "Hop Along, Harry and Sally" is a pattern to make two painted wood bunnies with painted wood feet, wired felt ears, and embroidered felt arms holding their favorite carrots. They also have miniature baskets with plastic Easter eggs. They're just adorable bunnies to make. Hop along and get yours now.

Please respect Linda's Terms of Use: All patterns, e-patterns, e-books, tutorials, how-to's, and e-products © 2004-2012 Linda Walsh Originals-Designs by Linda Walsh. All rights reserved, including downloading, mass producing, photocopying, enlargements, reductions,and all other forms of reproduction, website sharing, Email, RSS feeds, or any other means of redistribution. Commercial selling or reselling by any means, including eBay or any other website by permission only.

Products made from Linda Walsh Originals patterns, e-patterns, e-books, tutorials, how-to's, and e-products are intended for personal use for fun or small scale personal and business profit as long as you credit us with the design. Large scale commercial use (i.e. mass production) including wholesale distribution, catalog sales, and all other forms of large scale commercial production are by permission only. Items made from Linda Walsh Originals patterns, e-patterns, e-books, tutorials, how-to's, and e-products are intended for decoration only and are not intended for use by children. Not responsible for human error, individual workmanship, or printing errors in the E-books, E-products, tutorials, how-to's, patterns or the E-Patterns.

Copyright © 2012 - All Rights Reserved - Written By Linda Walsh of Linda Walsh Originals.  Linda Walsh Originals E-Patterns and Linda's Blog. Linda is a doll maker and doll pattern designer. http://lindawalshoriginals.com/

Easter Sampler Stitchery Pattern By Kaaren Johnston of The Painted Quilt


Easter is not that far off so I thought you'd like to see a wonderful Easter sampler pattern that Kaaren Johnston has on her The Painted Quilt blog. Looks like a great project for the rest of the winter months.


Copyright © 2010 - All Rights Reserved - Kaaren Johnston of The Painted Quilt

Here's what Kaaren had to say about her pattern:  Last Sunday morning, while doing a bit of housework trying to fill in time until the start of the gold medal hockey game between Canada and the United States, an idea for a new design popped into my head. After some quick sketching and even speedier stitching, a new design was born, just in time for this month’s First Friday Freebie.

I had actually completed another design that was designated for this month and it was all ready to go but when I realized that Easter is early this year and if I waited until next month to come up with something for Easter, it would be too late for this year. So the design that was originally slated for this month has been set aside until next month.

I hope you enjoy my Easter Sampler.


Please respect Kaaren's TERMS OF USE:  The use of my pattern/design and tutorials is limited to individual and personal use only. Distributing or selling my pattern or tutorials in any form is not permitted. They may not be used for commercial purposes unless written permission is granted. Credit for my pattern and tutorials should be included if displayed in any manner. Individual users may enlarge or reduce the size of the drawings for their personal use but may not alter them in any other way.

Kaaren's Bio: I am an artist and have recently retired from actively designing, publishing and travel teaching in the decorative painting industry. A short while later, in December of 2010, we moved from Eastern Ontario to the beautiful Annapolis Valley of Nova Scotia. Quilting, stitching, applique and most recently rug hooking have become my new passions. Oh, and did I mention that I love to make and collect pincushions and needlecases! Join me on the First Friday of every month when I release a new Freebie design for you to make and enjoy.


Copyright © 2009 - 2012 - All Rights Reserved - Kaaren Johnston of The Painted Quilt.

Please visit her The Painted Quilt blog at  http://thepaintedquilt.blogspot.com/ and her The Painted Quilt Etsy shop at http://www.etsy.com/shop/kaarenjohnston.

How To Make A Valentine's Day Charm Tutorial By Alma Stoller

Valentine's Day will be here soon. Still plenty of time to make this next project. If you always wanted to create your own Valentine Day's charm then you'll be happy to know that Alma Stoller has a wonderful tutorial on her Alma Stoller blog showing you how. Enjoy.


Copyright © 2012- All Rights Reserved - Written By Alma Stoller of Alma Stoller blog.

Here's what Alma had to say about her tutorial:  These charms are really easy to make.

Please respect Alma's TERMS OF USE:  I encourage you to link back to my post. Please give credit where credit is due. Unless otherwise noted, all photos, text, ideas, tutorials and artwork on this blog are the property of Alma Stoller. I'm happy to share with you, but please do not copy, reproduce or use without permission. Thank you.

Copyright © 2003-2012 - All Rights Reserved - Alma Stoller of Alma Stoller blog. Alma is an artist, designer, and blogger.

Please visit her Alma Stoller blog at http://www.almastoller.blogspot.com/, her Alma Stoller Facebook Page at  https://www.facebook.com/pages/Alma-Stoller/179752818769188 , and her Alma Stoller Tutorials ETSY Shop at http://www.etsy.com/shop/AlmaStollerTutorials.

My Heart Has Wings Tutorial By June Crawford of A Creative Dream


Do you love making hearts? If you do June Crawford has a wonderful tutorial on her A Creative Dream blog showing you how to make a heart with wings. Enjoy!


Copyright © 2009 - All Rights Reserved - Written by June Crawford of A Creative Dream

Here's what June had to say about her tutorial:  I'm fascinated with hearts and wings lately. Well, honestly, I've been fascinated with each for a very long time, but more recently it's been them together. I'm not sure if it has any underlying meaning or not...but they have been in my dreams for a while now. Driving home from work last Thursday an idea came to me.

I tend to see things completely finished when an idea comes to me, the details all have to be worked out later, but the underlying idea begins with a mold that I have for wings, an old, old, old quilt, and is influenced by some very old linens that my grandmother embellished.

Please respect June's TERMS OF USE:  Please note, in regard to the copyright, all of the directions and photographs in my tutorials are mine, you may not copy or reproduce them without my consent. These instructions are for you to use for PERSONAL use only, not for profit.

June's Bio:  Me... a dreamer, a ponderer of big and small thoughts. A wanna-be artist, a soon to be empty-nester... wondering what the heck I am gonna do with the rest of my life...

Copyright © 2009 - All Rights Reserved - June Crawford of A Creative Dream.

Please visit  her A Creative Dream blog at http://acreativedreamer.blogspot.com/. Her A Creative Dream Flickr page is at  http://www.flickr.com/photos/creativedreamer/.

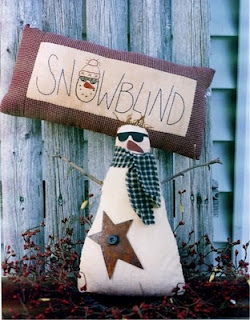
Mr. Cool & Snowblind E-Pattern By Sue Allemand of Palette Primitives

I just love primitive, country, and folk art crafts. Especially if they are snowmen.  Don't you? Well, Sue Allemand has a terrific e-pattern on her Free Stitchin' Patterns blog for creating a snowblind stitchery pillow and snowman doll.  Enjoy.


Copyright © 2010 - All Rights Reserved - Sue Allemand of Palette Primitives.

Here's what Sue had to say about her pattern: Quick and easy pattern! Make both of these for fun or profit! Glasses & nose are painted on.... while the star is an actual rusty, metal star! And he has cute floss hair! hehe

Please respect Sue's TERMS OF USE: All designs are copyright protected by Sue Allemand. You are given the right to make the finished products for personal use or profit (selling on the internet is fine), however, no mass producing, copying, sharing or distributing of the pattern or design is allowed. Please give credit to the me whenever possible. Thank you!

Copyright © 1999-2012- All Rights Reserved - Sue Allemand of Palette Primitives. Sue is a professional artist and designer.

Please visit Sue's Palette Primitives website at http://paletteprimitives.com, her Palette Primitives "Get Your Prim On" blog at http://www.paletteprimitives.blogspot.com, her Free Paintin' Patterns blog at http://freepaintinpatterns.blogspot.com and her Free Stitchin' Patterns blog at http://freestitchinpatterns.blogspot.com.


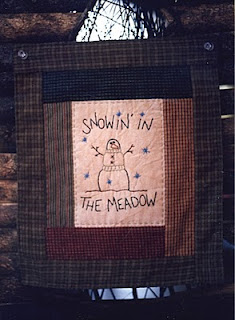
Snowin In The Meadow Stitchery E-Pattern By Sue Allemand of Palette Primitives

If someone says primitive, country, and folk art stitcheries - I'm all ears. If you are, too then you'll be pleased to know that Sue Allemand has a terrific e-pattern on her Free Stitchin' Patterns blog for a snowin in the meadow stitchery pillow or wall quilt.  I hope you enjoy Sue's free stitchery e-pattern.


Copyright © 2010 - All Rights Reserved - Sue Allemand of Palette Primitives.

Here's what Sue had to say about her pattern:  FREE Stitchery Pattern .... here's a sister to Snow Season! Make them both for a cute little pair to decorate with! Includes complete instructions for beginner stitching and sewing on the borders and backing for a pillow or wall quilt! I LOVE to use flannels with these - makes them nice and cozy!

Please respect Sue's TERMS OF USE: All designs are copyright protected by Sue Allemand. You are given the right to make the finished products for personal use or profit (selling on the internet is fine), however, no mass producing, copying, sharing or distributing of the pattern or design is allowed. Please give credit to the me whenever possible. Thank you!

Copyright © 1999-2012- All Rights Reserved - Sue Allemand of Palette Primitives. Sue is a professional artist and designer.

Please visit Sue's Palette Primitives website at http://paletteprimitives.com, her Palette Primitives "Get Your Prim On" blog at http://www.paletteprimitives.blogspot.com, her Free Paintin' Patterns blog at http://freepaintinpatterns.blogspot.com and her Free Stitchin' Patterns blog at http://freestitchinpatterns.blogspot.com.

How-To Make My Needle Felted Holiday Fiber Tree Free E-Project by Linda Walsh of Linda Walsh Originals

Needle Felted Holiday Fiber Tree
Copyright © 2012 - All Rights Reserved - Written By Linda Walsh of Linda Walsh Originals

During my sister's and my 2nd needle felting and roving crafting adventure she managed to get two alpaca head ornament creations completed and 1/2 of the fiber art picture she was creating done.

I, on the other hand, only managed to get a holiday fiber tree done and which is pictured above. I had wanted to create a red/white/green traditional tree, but the green roving colors I had weren't quite right. It ended up looking like a Southwestern holiday tree instead of a traditional holiday tree.

Oh, well. You can't always control the final look of your creations. It stands 7 1/2" tall and is felting over a Styrofoam base.

Here's how I made it:

Supplies Needed

6 1/2" by 3" Round White Foam Cone
White Roving - I used white roving from my sister's alpaca Sunflower which can be purchased HERE.
Roving Mixture - Light Brown, Dark Brown, Gold & Metallic Thread Mix
Roving - Gold, Lime Green, Dark Burgundy, Moss Green
Metallic Thread - Gold
Thick Braided DMC Floss - Burgundy
1" Star Cookie Cutter Mold
Clover Felting Needle Mat Large or Colonial Needle Needle Felting Foam
Blue Grip Single Felting Needle
Clover Pen Style Needle Felting Tool

Directions

1) Spread a light layer of the white roving all along the bottom of the white foam cone and extending about 1/2" up the sides. Needle felt to hold.
2) Take a long piece of the white roving and starting at the bottom of the cone wrap it around the cone in a counter clockwise direction needle felting it as you go along with the pen style needle felting too until you reach the top. Needle felt to the top to secure the end. Make sure the entire white foam is covered fully.
3) Fill the 1" star cookie cutter mold with gold roving and then needle felt it with the single felting needle and the felting mat or felting foam until it measures about 1/4" thick.
4) Position the gold star in the center of the top of the tree and needle felt it with the single felting needle to the top to hold it.
5) Cut a 42" long piece of the roving mixture and roll it between your hands until the roving mixture is about 1/4" thick. Needle felt all along the roving with the single felting needle and foam or mat.
6) Starting at the top of the tree next to the gold star needle felt one end of the roving mixture with the single felting needle to secure it to the top.
7) Slowly wrap and needle felt the 1/4" thick roving mixture around the tree in a counter clockwise direction with the pen style felting tool until it is pleasing to the eye and until you reach the bottom.
8) Needle felt the end of the roving mixture with the single felting needle to secure it around the bottom of the tree.
9) Pull a small piece of the gold roving abut 3/4" to 1" and roll it on your hands to create a small ball then needle felt the ball with the single felting needle and foam or mat until it is about 1/3 to 1/4" round. Create 16 gold balls.
10) Pull a small piece of the dark burgundy roving abut 3/4" to 1" and roll it on your hands to create a small ball then needle felt the ball with the single felting needle and foam or mat until it is about 1/3 to 1/4" round. Create 16 dark burgundy balls.
11) Pull a small piece of the moss green roving abut 3/4" to 1" and roll it on your hands to create a small ball then needle felt the ball with the single felting needle and foam or mat until it is about 1/3 to 1/4" round. Create 16 moss green balls.
12) Starting at the top of the tree and alternating the gold, dark burgundy, and moss green balls space and needle felt the balls along the bottom side of the roving mixture about 1/2" apart until you reach the bottom of the tree and end of the roving mixture with the pen style needle felting tool. Make more balls if need be.
13) Cut a piece of the thick braided DMC burgundy floss 45" long and needle felt one end to the top of the tree with the single felting needle.
14) Slowly wrap and needle felt the thick braided DMC burgundy floss in several places with the single felting needle around the tree in a counter clockwise direction until it is pleasing to the eye and until you reach the bottom.
15) Needle felt the end of the thick braided DMC burgundy floss with the single felting needle to secure it around the bottom of the tree.
16) Cut a piece of the gold metallic thread 45" long and needle felt one end to the top of the tree with the single felting needle.
17) Slowly wrap and needle felt the gold metallic thread in several places with the single felting needle around the tree in a counter clockwise direction until it is pleasing to the eye and until you reach the bottom.
18) Needle felt the end of the gold metallic thread with the single felting needle to secure it around the bottom of the tree.
19) Cut 26 to 30 pieces of the lime green roving 6" long and about 1/4" wide. Slightly roll each piece between your hands to slightly felt it.
20) Tie each of the 6" pieces into a bow.
21) Pin the center of the bows all along the tree until they are evenly spread out and pleasing to the eye.
22) Needle felt the centers of each of the bows with the single felting needle to secure them to the tree.

CONGRATULATIONS! Your needle felted holiday tree is done.

Please respect my Terms of Use: All patterns, e-patterns, e-books, tutorials, how-to's, and e-products © 2004-2012 Linda Walsh Originals-Designs by Linda Walsh. All rights reserved, including downloading, mass producing, photocopying, enlargements, reductions,and all other forms of reproduction, website sharing, Email, RSS feeds, or any other means of redistribution. Commercial selling or reselling by any means, including eBay or any other website by permission only.

Copyright © 2012 - All Rights Reserved - Written By Linda Walsh of Linda Walsh Originals, Linda Walsh Originals E-Patterns, and Linda's Blog. Linda is a doll maker and doll pattern designer. http://lindawalshoriginals.com/

Formica Chip Ornament Tutorial By June Crawford of A Creative Dream

Are you looking for an adorable ornament for your tree this year? Or to give as a gift to a co-worker?  If you are then check out the Formica Chip Ornament tutorial June Crawford has on her A Creative Dream  blog.


Copyright © 2009 - All Rights Reserved - Written by June Crawford of A Creative Dream

Here's what June had to say about her tutorial:   A Little Holiday Cheer... Folks around the office are complaining about how there is no holiday cheer in the building. So, me being me, I thought...ok, why not spread a tad of cheer. Since everyone in our building actually celebrates Christmas, I thought..."Hey, why not Secret Elves spreading Random Acts of Holiday Cheer?". Imagine something like a "Secret Santa" sort of thing, where everyone is assigned a person from those participating to share random acts of cheer with. ...I would have gone with the Secret Santa, but I really prefer to think of myself as a cute little elf...rather than a rotund one. So...two weeks ago I posted a flyer, and stuck one in every mail box in the office encouraging people to participate. Tomorrow is the deadline for signing up.

As of Friday, when I left at the end of the day...counting myself and the two other girls that originally thought it was a great idea...a total of six are participating.  I think I have discovered why people are complaining about no holiday cheer.

Since so few are participating, and since I expect that very few more will be joining in, I decided that I would begin the spreading of random acts of holiday cheer when I assign everyone their victim. Besides, it would give me the chance to try something that I'd been wanting to for a while now. Off I go to my local home improvement store and their counter top samples. You know the ones I am talking about? The are in the kitchen area...they are small tiles of laminate with a hole punched in them so they can hang. Great for using to make small, very simple, ornaments.

Please respect June's TERMS OF USE:  Please note, in regard to the copyright, all of the directions and photographs in my tutorials are mine, you may not copy or reproduce them without my consent. These instructions are for you to use for PERSONAL use only, not for profit..

June's Bio:  Me... a dreamer, a ponderer of big and small thoughts. A wanna-be artist, a soon to be empty-nester... wondering what the heck I am gonna do with the rest of my life...

Copyright © 2009 - All Rights Reserved - June Crawford of A Creative Dream.

Please visit  her A Creative Dream blog at http://acreativedreamer.blogspot.com/. Her A Creative Dream Flickr page is at  http://www.flickr.com/photos/creativedreamer/ .

Countdown to Christmas - An Advent Chest of Drawers Tutorial by Ros Coffey of RosMadeMe Blog

Are you looking for an adorable advent chest of drawers Christmas project? If you are Ros Coffey has a wonderful tutorial on her RosMadeMe Blog blog showing you how to make one. Enjoy the holidays.

Countdown to Christmas - An Advent Chest of Drawers Tutorial

Copyright © 2012 - All Rights Reserved - Written by Ros Coffey of RosMadeMe Blog.

Here's what Ros had to say about her tutorial:  I am typing this with sticky fingers, so any typos you see are due to my fingers not leaving the keys... Right so I have found my Christmas making mojo (it was hidden behind last year's Christmas cards) and now I am ready to get on with the next project which is a little Advent chest of drawers calendar... Thomas Chippendale watch out!

I don't know about you but I am a sucker for crafting magazines, I love to browse through them, especially when someone I know is in there... better still if I did not expect to see them, take a bow Wendy Massey who is featuring in this month's Craftseller, as one of their "regular designers", well that is really thrilling as Wendy also runs Handmade Monday. Anyway, at the moment most of the magazines are giving away crafting papers... but I don't make cards or scrapbook and I can only pass on so much which means I have to find a use for it and the Advent chest of drawers is it.


Ros's Bio:I live by the sea, in Essex, in Leigh-on-sea. I have been making things since I was a child, earliest memories were embroidering squares of binca matting, making felt egg cups and ripping back my knitting when my sister had picked up a dropped stitch... yep, it really did have to be all my own work! I am a dreadful hoarder, with stashes of wool and fabric hidden around my house, together with the projects that I have not yet finished. I am currently making cushions, quilted, appliqued, stencilled... actually just anything that I will enjoy crafting.

Copyright © 2010 - 2012 - All Rights Reserved - Ros Coffey of RosMadeMe Blog .

Please visit her RosMadeMe blog at http://rosmademe.blogspot.com .

No Sew Quilted Ball - Christmas Tutorial No 3 by Ros Coffey of RosMadeMe Blog

I just love ornaments that are easy to make so I was happy to see that Ros Coffey had a tutorial on her RosMadeMe Blog blog showing you how to make no sew quilted ball ornaments. Enjoy making yours.

No Sew Quilted Ball - Christmas Tutorial No 3

Copyright © 2012 - All Rights Reserved - Written by Ros Coffey of RosMadeMe Blog.

Here's what Ros had to say about her tutorial:  I have noticed recently that when I post up tutorials, people post that although they like it, they cannot sew, knit or crochet... so this week, you have no excuse all you need to do is pin and push. I need to thank the ladies of the Quilting Board in the US for pointing me in the direction of this technique... I had seen these balls before but thought that they looked really complicated but they are not, but when you make them and are asked how, just nod knowingly and say it is all down to technique when you make an eight point star Christmas ball!

Ros's Bio:I live by the sea, in Essex, in Leigh-on-sea. I have been making things since I was a child, earliest memories were embroidering squares of binca matting, making felt egg cups and ripping back my knitting when my sister had picked up a dropped stitch... yep, it really did have to be all my own work! I am a dreadful hoarder, with stashes of wool and fabric hidden around my house, together with the projects that I have not yet finished. I am currently making cushions, quilted, appliqued, stencilled... actually just anything that I will enjoy crafting.

Copyright © 2010 - 2012 - All Rights Reserved - Ros Coffey of RosMadeMe Blog .

Please visit her RosMadeMe blog at http://rosmademe.blogspot.com .

Making Boxes Out of Christmas Cards Tutorial By Laura Carson of Artfully Musing Blog

You probably have stacks of old Christmas cards that you hate to just throw away. Right? Well, you don't have to. You can turn those old cards into boxes. If you want to know how just check out the tutorial that Laura Carson has on her Artfully Musing blog. Just think about all the wonderful little boxes you can make.


Copyright © 2011 - All Rights Reserved - Written by Laura Carson of Artfully Musing.

Here's what Laura had to say about her tutorial:  So you have stacks of Christmas cards with great art on the front and what can you do with them. One thing is to make them into boxes. These little boxes are great for ATCs, gift cards, jewelry etc. and they are so simple to make.

Please respect Laura's TERMS OF USE:  My tutorials are protected by U.S. & International copyright laws.  Do not copy, duplicate, alter or reproduce in anyway.  Please use for inspiration only. ALL NAMES, LOGOS AND DESIGNS ARE THE PROPERTY OF THEIR RESPECTIVE OWNERS. ©2012 Laura Carson (Artfully Musing), All Rights Reserved

Laura's Bio: After retiring from the computer software industry where I spent my career designing, building and marketing software, I needed a creative outlet. A few years ago I discovered Mixed Media Art and have had a love affair ever since. I’ve taught classes in Altered Books, Handmade Books, Collage Art and Mix Media Art. I currently design for Alpha Stamps and I enjoy trading in various art groups. Starting this blog is a way of sharing my art and the wonderful art I have received from others. I specialize in very detailed multi-layered and textured pieces. I live in Anthem Arizona with my husband Kevin, dog Sandy, and cat Tigger.

Copyright © 2011 - All Rights Reserved - Laura Carson of Artfully Musing.

Please visit her Artfully Musing blog at http://artfullymusing.blogspot.com/ .

The Elves Christmas Garland - Christmas Tutorial No. 11 by Ros Coffey

What could be cheerier than a mittens, stockings, and scarves garland made of felt? Not much. If you agree then you'll be pleased to know that Ros Coffey has a tutorial on her RosMadeMe Blog blog showing you how to make this adorable garland.   I just love it.

The Elves Christmas Garland - Christmas Tutorial no. 11

Copyright © 2011 - All Rights Reserved - Written by Ros Coffey of RosMadeMe Blog.

Here's what Ros had to say about her tutorial:  I like working with felt, it is so forgiving and it is brilliant at making winter outfits for elves. Now as you all know, no self respecting helper of Santa Claus would dream of turning up for work without his mittens, socks and matching scarf... so in case of any elf being caught short you will now have a spare wardrobe hanging over your fireplace.

Ros's Bio:I live by the sea, in Essex, in Leigh-on-sea. I have been making things since I was a child, earliest memories were embroidering squares of binca matting, making felt egg cups and ripping back my knitting when my sister had picked up a dropped stitch... yep, it really did have to be all my own work! I am a dreadful hoarder, with stashes of wool and fabric hidden around my house, together with the projects that I have not yet finished. I am currently making cushions, quilted, appliqued, stencilled... actually just anything that I will enjoy crafting.

Copyright © 2010 - 2012 - All Rights Reserved - Ros Coffey of RosMadeMe Blog .

Please visit her RosMadeMe blog at http://rosmademe.blogspot.com .

Bottle Brush Christmas Trees-Bleaching & Dying Tutorial By By Cathy Jackson of Hazelruthes


I just LOVE colorful Christmas decorations.  If you do, too then you'll be happy to know  that Cathy Jackson of Hazelruthe's blog has a wonderful tutorial showing you how to make colorful Christmas Trees from bottle brushes.


Copyright © 2009 - Written By Cathy Jackson of Hazelruthe's Blog

Here's what Cathy had to say about her tutorial:  Have you ever wondered how to get those cool looking cream and colored bottle brush trees. Well I finally tried it this year and it worked! First of all they come that dark green with the white snow on them and usually a bag full of them. I got a bag of 16--assorted sizes--at Big Lots for 6.99.

Please respect Cathy's TERMS OF USE: You may use my tutorials for your own personal use to produce a project or use the technique but my tutorials may not be copied, reprinted, emailed, or transmitted in any form without my permission. You may, however, link back to the respective tutorials page of my Hazelruthes blog.

Copyright © 2009 - All Rights Reserved - Cathy Jackson of Hazelruthe's Blog. Please visit Cathy's Hazelruthe's blog at http://www.hazelruthes.blogspot.com/ and her Primitive Goodes Etsy shoppe at http://www.etsy.com/shop/primitivegoodes .

Christmas Tutorials Start Here - Chris's Patchwork Decorations by Ros Coffey of RosMadeMe Blog

I just love quilted ornaments? Don't you? If you do you'll be pleased to know that Ros Coffey has a tutorial on her RosMadeMe Blog blog showing you how to make some adorable quilted star ornaments.

Christmas Tutorials Start Here - Chris's Patchwork Decorations Tutorial

Copyright © 2012 - All Rights Reserved - Written by Ros Coffey of RosMadeMe Blog.

Here's what Ros had to say about her tutorial:  OK, can you believe four months today Christmas Day will be over? We started a Christmas countdown at this time last year, so throughout the year I have been collecting ideas (and discarding them, too!) ready for the fray.

Ros's Bio:I live by the sea, in Essex, in Leigh-on-sea. I have been making things since I was a child, earliest memories were embroidering squares of binca matting, making felt egg cups and ripping back my knitting when my sister had picked up a dropped stitch... yep, it really did have to be all my own work! I am a dreadful hoarder, with stashes of wool and fabric hidden around my house, together with the projects that I have not yet finished. I am currently making cushions, quilted, appliqued, stencilled... actually just anything that I will enjoy crafting.

Copyright © 2010 - 2012 - All Rights Reserved - Ros Coffey of RosMadeMe Blog .

Please visit her RosMadeMe blog at http://rosmademe.blogspot.com .

Mooo-ey Christmas Tutorial By June Crawford of A Creative Dream

Do you need a small gift for a co-worker or teacher this holiday season?  If so you might want to consider making June Crawford's "Mooo-ey Christmas" clay ornament that she shows us all how to make on her A Creative Dream's  blog   Have fun making your ornament.


Copyright © 2009 - All Rights Reserved - Written by June Crawford of A Creative Dream

Here's what June had to say about her tutorial:   Really bad, huh? Even for me...moo-ey....but hey, it's Christmas... The luncheon went well at work, although I have to tell ya, there was more cake left over than I'd expected. Usually, when I take treats in they are wolfed down within the hour (The Little One says you can feel the earth rumble as they all make their way to where the treats are)...we did have an awful lot of stuff there though, so I am going to attribute it to that...'cause the cake was darned good!

And, now...I am finishing up the ornaments I want to give my co-workers. This is the first one I got finished. My "real" job deals with agriculture, and one of the offices in the building deals specifically with milk. This ornament is for Cathy, who works in that office. It seemed only appropriate that I something cute using cows for her.

One of my favorite ornaments on my tree is a crescent moon with a cow dangling over it that I made several years ago (you can see the moon behind these cows)...the cow jumping over the moon. I liked how the cow turned out when I made it, and thought I'd use the same sort of thing for this. The moon one is made of salt dough, this one is made of polymer clay.

Please respect June's TERMS OF USE:  Please note, in regard to the copyright, all of the directions and photographs in my tutorials are mine, you may not copy or reproduce them without my consent. These instructions are for you to use for PERSONAL use only, not for profit.

June's Bio:  Me... a dreamer, a ponderer of big and small thoughts. A wanna-be artist, a soon to be empty-nester... wondering what the heck I am gonna do with the rest of my life...

Copyright © 2009 - All Rights Reserved - June Crawford of A Creative Dream.

Please visit  her A Creative Dream blog at http://acreativedreamer.blogspot.com/. Her A Creative Dream Flickr page is at  http://www.flickr.com/photos/creativedreamer/ .

Sentiment Ornies E-Pattern By Sue Allemand of Palette Primitives

Word ornaments have always been one of my favorite kinds of ornaments. If they're yours as well then you'll be happy to know that Sue Allemand has a terrific e-pattern on her Free Stitchin' Patterns for creating 6 different word ornaments. Have fun!


Copyright © 2010 - All Rights Reserved - Sue Allemand of Palette Primitives.

Here's what Sue had to say about her pattern: This popular pattern has now been made FREE for you all to enjoy!  These fun stitched ornies have pipberry hangers and are really adorable hanging or tucked in your tree!!  Make a bunch as package tie-ons as well!!

Please respect Sue's TERMS OF USE: All designs are copyright protected by Sue Allemand. You are given the right to make the finished products for personal use or profit (selling on the internet is fine), however, no mass producing, copying, sharing or distributing of the pattern or design is allowed. Please give credit to the me whenever possible. Thank you!

Copyright © 1999-2012- All Rights Reserved - Sue Allemand of Palette Primitives. Sue is a professional artist and designer.

Please visit Sue's Palette Primitives website at http://paletteprimitives.com, her Palette Primitives "Get Your Prim On" blog at http://www.paletteprimitives.blogspot.com, her Free Paintin' Patterns blog at http://freepaintinpatterns.blogspot.com and her Free Stitchin' Patterns blog at http://freestitchinpatterns.blogspot.com.

The Snuggly Reversible Cable Scarf - Christmas Tutorial No. 4 By Ros Coffey of RosMadeMe Blog

How would you like to make a gift that you could give to either a male or a female? Impossible you say. Not so. Just check out the reverse cable scarf tutorial that Ros Coffey has on her RosMadeMe Blog blog. Perfect gift for a guy or a gal!

The Snuggly Reversible Cable Scarf - Christmas Tutorial No. 4

Copyright © 2011 - All Rights Reserved - Written by Ros Coffey of RosMadeMe Blog.

Here's what Ros had to say about her tutorial:  Right, who is already running screaming for the door at the thought that not only are you going to cable but your knitting is going to be the same on each side? I promise you it will be really easy, think about it there are three stitches that look the same on both sides: garter, rib and moss or seed stitch and we will be using rib and moss stitch, and to help you further there is a YouTube demo of cabling pasted at the end of the pattern.

The scarf is made with Sirdar Big Softie and measures 6' 6" and the great thing is it will knit up really quickly... I made mine in two days on the train (45 min train journeys) and the great thing is with size 10 needles few are brave enough to sit next to you! The good news is this scarf is butch enough for chaps and, soft and snuggly enough for girls.


Ros's Bio:I live by the sea, in Essex, in Leigh-on-sea. I have been making things since I was a child, earliest memories were embroidering squares of binca matting, making felt egg cups and ripping back my knitting when my sister had picked up a dropped stitch... yep, it really did have to be all my own work! I am a dreadful hoarder, with stashes of wool and fabric hidden around my house, together with the projects that I have not yet finished. I am currently making cushions, quilted, appliqued, stencilled... actually just anything that I will enjoy crafting.

Copyright © 2010 - 2012 - All Rights Reserved - Ros Coffey of RosMadeMe Blog .

Please visit her RosMadeMe blog at http://rosmademe.blogspot.com .

Stripped Bare for Christmas Action - More Quilted Tree Decs Tutorial by Ros Coffey of RosMadeMe Blog

I just love quilted ornaments? Don't you? If you do you'll be pleased to know that Ros Coffey has a tutorial on her RosMadeMe Blog blog showing you how to make some adorable quilted ornaments.

Stripped Bare for Christmas Action - More Quilted Tree Decs Tutorial

Copyright © 2012 - All Rights Reserved - Written by Ros Coffey of RosMadeMe Blog.

Here's what Ros had to say about her tutorial:  Back in July we made a cushion to celebrate the Fourth of July, so using the same technique we are going to create some more great quilted decorations to fill your tree. Yet again we are going to raid the pastry cutter tin to find great shapes to use on the tree, you can use hearts, stockings, hearts, mittens, hearts, parcels and did I mention hearts? This is another great way of using up scrap strips to create effective tree decs, so let's hit your Christmas stash of fabrics and get started.

Ros's Bio:I live by the sea, in Essex, in Leigh-on-sea. I have been making things since I was a child, earliest memories were embroidering squares of binca matting, making felt egg cups and ripping back my knitting when my sister had picked up a dropped stitch... yep, it really did have to be all my own work! I am a dreadful hoarder, with stashes of wool and fabric hidden around my house, together with the projects that I have not yet finished. I am currently making cushions, quilted, appliqued, stencilled... actually just anything that I will enjoy crafting.

Copyright © 2010 - 2012 - All Rights Reserved - Ros Coffey of RosMadeMe Blog .

Please visit her RosMadeMe blog at http://rosmademe.blogspot.com .

Make A Vintage Style Star From A Cereal Box Tutorial By Cathy Jackson of Hazelruthes

I just love all sorts of glittery Christmas ornaments.  If you do, too then you're going to love Cathy Jackson's tutorial on her Hazelruthe's blog showing you how to make a star ornament out of a cereal box.

Make A Vintage Style Star From A Cereal Box Tutorial

Copyright © 2011 - Written By Cathy Jackson of Hazelruthe's Blog

Here's what Cathy had to say about her tutorial:  TSee what you can do with a cereal box...... You can make a pretty vintage looking Christmas star! I've seen several paper stars around Blogland and decided I needed to try it myself and thought I would share what I did.

Please respect Cathy's TERMS OF USE: You may use my tutorials for your own personal use to produce a project or use the technique but my tutorials may not be copied, reprinted, emailed, or transmitted in any form without my permission. You may, however, link back to the respective tutorials page of my Hazelruthes blog.

Copyright © 2011 - All Rights Reserved - Cathy Jackson of Hazelruthe's Blog. Please visit Cathy's Hazelruthe's blog at http://www.hazelruthes.blogspot.com/ and her Primitive Goodes Etsy shoppe at http://www.etsy.com/shop/primitivegoodes .

Stuff The Bunting by Christmas Tree Tutorial by Ros Coffey of RosMadeMe Blog

Do you like to decorate for the holidays? Are you looking for a great decoration? If you do and you are then you'll be pleased to know that Ros Coffey has a tutorial on her RosMadeMe Blog blog showing you how to make a bunting Christmas tree decoration.

Stuff The Bunting Christmas Tree Tutorial

Copyright © 2012 - All Rights Reserved - Written by Ros Coffey of RosMadeMe Blog.

Here's what Ros had to say about her tutorial:  Our local fabric shop... the wonderful Belle Fabrics (who still do not have a website... grrr!) had a version of this tree in the window, so with their permission I used it as a starting point for my tree. I thought you might like this tree which means we can use lots of the techniques from the last couple of years, from how to make bunting, to the Christmas stars we are going to use on top of it.

Ros's Bio:I live by the sea, in Essex, in Leigh-on-sea. I have been making things since I was a child, earliest memories were embroidering squares of binca matting, making felt egg cups and ripping back my knitting when my sister had picked up a dropped stitch... yep, it really did have to be all my own work! I am a dreadful hoarder, with stashes of wool and fabric hidden around my house, together with the projects that I have not yet finished. I am currently making cushions, quilted, appliqued, stencilled... actually just anything that I will enjoy crafting.

Copyright © 2010 - 2012 - All Rights Reserved - Ros Coffey of RosMadeMe Blog .

Please visit her RosMadeMe blog at http://rosmademe.blogspot.com .
Powered by Blogger.