Art Quilting 101 4-Part Tutorial By Pamela Kellogg of Kitty and Me Designs

I have been in love with crazy quilting creations for quite some time and was finally able to take a class on it in June. Well, of course, I fell even more in love with it (if that's possible) during the class. Now all I can think about is crazy quilting creations.

I know I've said this a million times before, but if you want to learn something learn it from the experts. Well, Pamela Kellogg, is definitely a well respected and recognized expert on crazy quilting, creative embroidery, silk ribbon embroidery (SRE), and cross-stitch. Her creations over the year just astonish me. I just love going to her blog and Etsy shop for the beautiful eye candy that you find there. So, you can imagine how pleased I was to see that she had a 4-part tutorial on her Kitty & Me Designs blog teaching you about art quilting. I hope you enjoy Pam's tutorials as much as I did.

Here's what Pamela had to say about her tutorial:  Part 1 - Since I'll be starting to post my Art Quilting 101 tutorial next week, I thought I would take a few moments to give you a supply list and a few suggestions for embellishments.

Part 2 - In this post, I will show you how to layer the background. Please keep in mind that this is only one way of making an art quilt. The possibilities are endless but for anyone who would like to try Art Quilting and has no clue where to begin, this tutorial should help you.

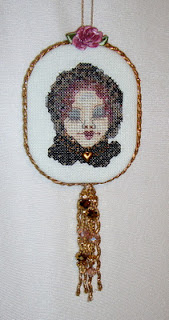
For beginners, it's best to start with a theme and color scheme. Choose a vintage photo either on paper or on fabric. I printed my little girl on fabric and then chose elements that coordinated with the photo colors:

Part 3 - Now that you have your art quilt all layered and sewn together, it's time to start embellishing it. This can be a bit overwhelming at first. I'm sure you're wondering where to start. First let me say, that you have to let go of how you think it should be and allow it to be what it becomes! That is very important with art of any type. Try not to stress over it! Just go with it and let be what it wants to be.

Part 4 - This is the final part of how to finish an art quilt. Of course, you can do it however you want to. I just thought I'd offer you one way to do it if you've never made an art quilt before.


Please respect Pamela's TERMS OF USE:  I like to share Craft and Embroidery Tutorials on how I do a variety of projects and techniques and helpful hints. I add to this list regularly. Please feel free to download the directions and if you try them, please let me know if you enjoyed the project!

Pamela's Bio:Designer, Textile Artist and Instructor. Although I love all forms of needlework and embroidery, my true passion is Crazy Quilting. I enjoy a quiet life in our little cottage by a lake in Northern Illinois. I frequent flea markets and antique shops looking for do-dads that I can sew on to my stitching projects. I offer some of my handmade items, along with my mom's and my sister's, in my Etsy shop. I enjoy baking and share many of my recipes here. And did I mention glitter?

Copyright © 2005 - 2012 - All Rights Reserved - Pamela Kellogg of Kitty & Me Designs .

Please visit her Kitty & Me Designs blog at http://kittyandmedesigns.blogspot.com/ and her Kitty & Me Designs Etsy shop at http://www.etsy.com/shop/kittyandme.


Adding Snow and Icicles to Your Projects Tutorial By Laura Carson of Artfully Musing Blog

What would a mixed media winter creation be without icicles?   If you've always wanted to learn how to create icicles then you'll be happy to know that Laura Carson has a wonderful tutorial on her Artfully Musing blog showing you how.  I hope you enjoy her tutorial.  


Copyright © 2011 - All Rights Reserved - Written by Laura Carson of Artfully Musing.

Here's what Laura had to say about her tutorial:  A great way to add an extra touch to winter themed art is with snow and icicles. You can achieve the look of ice and snow using White Flocking Powder and Twinklets Diamond Dust Glitter Sugar Crystal. Both products are available at some craft stores, art supply stores, and on the Internet. To give this Christmas Toy Shop a touch of winter I added snow and icicles to the bay windows.

Please respect Laura's TERMS OF USE:  My tutorials are protected by U.S. & International copyright laws.  Do not copy, duplicate, alter or reproduce in anyway.  Please use for inspiration only. ALL NAMES, LOGOS AND DESIGNS ARE THE PROPERTY OF THEIR RESPECTIVE OWNERS. ©2012 Laura Carson (Artfully Musing), All Rights Reserved

Laura's Bio: After retiring from the computer software industry where I spent my career designing, building and marketing software, I needed a creative outlet. A few years ago I discovered Mixed Media Art and have had a love affair ever since. I’ve taught classes in Altered Books, Handmade Books, Collage Art and Mix Media Art. I currently design for Alpha Stamps and I enjoy trading in various art groups. Starting this blog is a way of sharing my art and the wonderful art I have received from others. I specialize in very detailed multi-layered and textured pieces. I live in Anthem Arizona with my husband Kevin, dog Sandy, and cat Tigger.

Copyright © 2011 - All Rights Reserved - Laura Carson of Artfully Musing.

Please visit her Artfully Musing blog at  http://artfullymusing.blogspot.com/.


Tutorial - How To Make Button Clusters By Pamela Kellogg of Kitty and Me Designs

Buttons and button clusters are used in all sorts of crafts these days including crazy quilting.   If you've always want to learn how to create button clusters for crazy quilting  you'll be happy to know that Pamela Kellogg has a tutorial on her Kitty & Me Designs blog showing you how.

Tutorial - How To Make Button Clusters

Copyright © 2011 - All Rights Reserved - Written by Pamela Kellogg of Kitty & Me Designs.

Here's what Pamela had to say about her tutorial:  Now that you've all seen my Crazy Button Quilt:

I thought I would share a tutorial on how to create Button Clusters.

Button Clusters are not only for Crazy Quilting. They can be added to fabric bracelets, art quilts, art dolls, really anything that buttons can be sewn onto!


Please respect Pamela's TERMS OF USE:  I like to share Craft and Embroidery Tutorials on how I do a variety of projects and techniques and helpful hints. I add to this list regularly. Please feel free to download the directions and if you try them, please let me know if you enjoyed the project!

Pamela's Bio:Designer, Textile Artist and Instructor. Although I love all forms of needlework and embroidery, my true passion is Crazy Quilting. I enjoy a quiet life in our little cottage by a lake in Northern Illinois. I frequent flea markets and antique shops looking for do-dads that I can sew on to my stitching projects. I offer some of my handmade items, along with my mom's and my sister's, in my Etsy shop. I enjoy baking and share many of my recipes here. And did I mention glitter?

Copyright © 2005 - 2012 - All Rights Reserved - Pamela Kellogg of Kitty & Me Designs .

Please visit her Kitty & Me Designs blog at http://kittyandmedesigns.blogspot.com/ and her Kitty & Me Designs Etsy shop at http://www.etsy.com/shop/kittyandme.


How To Assemble A Crazy Quilt 7-Part Tutorial By Pamela Kellogg of Kitty and Me Designs

If you've ever seen a beautiful crazy quilt made of individual crazy quilt blocks you know there is a LOT of work involved in putting it together.  Well,  Pamela Kellogg has created a 7 step tutorial on her Kitty & Me Designs blog showing you exactly how it was done for her exquisite Marie Antoinette quilt.  Talk about eye candy.  Her quilt is absolutely stunning.


Copyright © 2011 - All Rights Reserved - Written by Pamela Kellogg of Kitty & Me Designs.

Here's what Pamela had to say about her tutorial:  Step 1 - Since I'm putting my Marie Antoinette CrazyQuilt together, I thought I would share step by step, the process that I use to assemble my crazyquilts. I know other crazyquilters have shared their process but I'm sure we all do things a little differently.

Step - 2 I've completed Step 2 of the assembly process on my Marie Antoinette Crazy Quilt. If there's one coping skill that I've learned with having ADD/ADHD, it's how to break things down into manageable portions!

Assembling any type of quilt can be overwhelming however, when we take the time to look at each step of the process, and focus on only one step at a time, it instantly becomes more "doable".

Steps 3 and 4- Steps 3 and 4 in the Crazy Quilt assembly process are both optional. In the case of my Marie Antoinette quilt, I wanted to sash my blocks with a pretty pink trim.. This has to be done at this point. If you choose to use trim to sash your blocks, add that now:

Steps 5 and 6 - On to steps 5 and 6 of How To Assemble A Crazy Quilt.

Step 7 - There's one final step in finishing a crazy quilt. We need to hold the front of the quilt to the back of the quilt. The best way I've found to do this is to sew buttons onto the back:


Please respect Pamela's TERMS OF USE:  I like to share Craft and Embroidery Tutorials on how I do a variety of projects and techniques and helpful hints. I add to this list regularly. Please feel free to download the directions and if you try them, please let me know if you enjoyed the project!

Pamela's Bio:Designer, Textile Artist and Instructor. Although I love all forms of needlework and embroidery, my true passion is Crazy Quilting. I enjoy a quiet life in our little cottage by a lake in Northern Illinois. I frequent flea markets and antique shops looking for do-dads that I can sew on to my stitching projects. I offer some of my handmade items, along with my mom's and my sister's, in my Etsy shop. I enjoy baking and share many of my recipes here. And did I mention glitter?

Copyright © 2005 - 2012 - All Rights Reserved - Pamela Kellogg of Kitty & Me Designs .

Please visit her Kitty & Me Designs blog at http://kittyandmedesigns.blogspot.com/ and her Kitty & Me Designs Etsy shop at http://www.etsy.com/shop/kittyandme.

Tutorial - Dyeing Silk Ribbons with RIT Dye By Pamela Kellogg of Kitty and Me Designs

Crazy quilting and creative embroidery uses a LOT of silk ribbons.  Some of the prettiest creations are done with silk ribbons that have been dyed various shades or colors.  If you've ever wanted to learn how to dye your own silk ribbons Pamela Kellogg has a tutorial on her Kitty & Me Designs blog showing you how  it's done.  Now that I know how to do it I'll soon be dying my own.  How about you?

Tutorial - Dyeing Silk Ribbons with RIT Dye
Sources For Silk Ribbon


Copyright © 2011 - All Rights Reserved - Written by Pamela Kellogg of Kitty & Me Designs.

Here's what Pamela had to say about her tutorial:  I've had several requests for a tutorial on how I dye my Silk Ribbons for my Crazyquilting. It's much easier than you might think! Get ready to make a mess and have a lot of fun! It's like dyeing Easter Eggs!

Please respect Pamela's TERMS OF USE:  I like to share Craft and Embroidery Tutorials on how I do a variety of projects and techniques and helpful hints. I add to this list regularly. Please feel free to download the directions and if you try them, please let me know if you enjoyed the project!

Pamela's Bio:Designer, Textile Artist and Instructor. Although I love all forms of needlework and embroidery, my true passion is Crazy Quilting. I enjoy a quiet life in our little cottage by a lake in Northern Illinois. I frequent flea markets and antique shops looking for do-dads that I can sew on to my stitching projects. I offer some of my handmade items, along with my mom's and my sister's, in my Etsy shop. I enjoy baking and share many of my recipes here. And did I mention glitter?

Copyright © 2005 - 2012 - All Rights Reserved - Pamela Kellogg of Kitty & Me Designs .

Please visit her Kitty & Me Designs blog at http://kittyandmedesigns.blogspot.com/ and her Kitty & Me Designs Etsy shop at http://www.etsy.com/shop/kittyandme.


Jack The Jester Cross-Stitch By By Romona King Of Northbrook Designs

I thought you might all like to know that Romona King of Northbrook Designs has created a wonderful free cross-stitch design for a court jester on her Northbrook Stitches blog.  Have fun with her cross-stitch. 


Jack The Jester
© 2012 by Romona King of Northbrook Designs

If you'd like to download Romona's cross-stitch design please click on the picture above or CLICK HERE TO DOWNLOAD

Here's what Romona had to say about her cross-stitch design:

Jack the Jester is a doll that I made, and  is the first of a what I hope will be a series of Jester patterns. Included in this design is a picture of the actual Jester face and the completed piece, the stitching chart, the floss colours chart based on DMC colours. The floss chart also includes the floss usage chart which gives you the actual number of stitches made, and the amount of thread you need. I have also added a colour graph for your convenience. 

Please respect Romona's Terms of Use - This design is offered freely, please respect the designers work and give credit where due. You may use the design to create projects to sell but not for mass production. 

Copyright © 2012 - All Rights Reserved — Written By Romona King of Northbrook Designs. Romona is a crafter, doll maker, painter, needlework artist, and mixed media artist. You can visit her Northbrook Designs blog online at http://northbrookdesigns.blogspot.com/ and her Northbrook Stitches blog at http://www.northbrookstitches.blogspot.com/. You can also visit her Northbrook Designs shop at http://www.northbrookdesigns.com/.

How To Clean A Non-Washable Quilts Tutorial By Pamela Kellogg of Kitty and Me Designs

Have you ever wondered how to go about cleaning a crazy quilt?  You can't exactly wash it now - can you?  Well,  they do get dirty and they do need to be cleaned.  So, how do you do it?   If  you want to know the trick Pamela Kellogg has a post on her Kitty & Me Designs blog telling you how.  Now why didn't I think of that?

How To Clean A Non-Washable Quilts

Copyright © 2010 - All Rights Reserved - Written by Pamela Kellogg of Kitty & Me Designs.

Here's what Pamela had to say about her post:  Crazy quilts, art quilts, antique & vintage quilts....many are not washable or dry cleanable. So how do you clean them? It's easier than you think.

All you need is a vacume cleaner and a piece of plastic canvas:


Please respect Pamela's TERMS OF USE:  I like to share Craft and Embroidery Tutorials on how I do a variety of projects and techniques and helpful hints. I add to this list regularly. Please feel free to download the directions and if you try them, please let me know if you enjoyed the project!

Pamela's Bio:Designer, Textile Artist and Instructor. Although I love all forms of needlework and embroidery, my true passion is Crazy Quilting. I enjoy a quiet life in our little cottage by a lake in Northern Illinois. I frequent flea markets and antique shops looking for do-dads that I can sew on to my stitching projects. I offer some of my handmade items, along with my mom's and my sister's, in my Etsy shop. I enjoy baking and share many of my recipes here. And did I mention glitter?

Copyright © 2005 - 2012 - All Rights Reserved - Pamela Kellogg of Kitty & Me Designs .

Please visit her Kitty & Me Designs blog at http://kittyandmedesigns.blogspot.com/ and her Kitty & Me Designs Etsy shop at http://www.etsy.com/shop/kittyandme.

Pam's "Twist & Tack" Silk Ribbon Rose Tutorial By Pamela Kellogg of Kitty and Me Designs

I just love creative embroidery flowers and love learning how to create them. If you do, too then you'll be pleased to know that Pamela Kellogg has a tutorial on her Kitty & Me Designs blog showing you how to create a silk ribbon rose. I know I'll be practicing this many, many times before I get it right.  Will you?

Pam's "Twist & Tack" Silk Ribbon Rose Tutorial

Copyright © 2010 - All Rights Reserved - Written by Pamela Kellogg of Kitty & Me Designs.

Here's what Pamela had to say about her tutorial:  I was asked if I would share how I do the Silk Ribbon Roses on my crazy quilt projects. Gladly! I just had to wait to write it up until I could take photos. Speaking of which, I apologize for the fuzzy ones. They looked fine on the camera when I took them but when I loaded them into the computer, I was quite disappointed.

Still, I think the photos are good enough for you to see how to do this. It's a really easy way to do silk ribbon roses and please keep in mind, they do not need to be perfect! Roses in nature are not perfect so try to keep that in mind while stitching.


Please respect Pamela's TERMS OF USE:  I like to share Craft and Embroidery Tutorials on how I do a variety of projects and techniques and helpful hints. I add to this list regularly. Please feel free to download the directions and if you try them, please let me know if you enjoyed the project!

Pamela's Bio:Designer, Textile Artist and Instructor. Although I love all forms of needlework and embroidery, my true passion is Crazy Quilting. I enjoy a quiet life in our little cottage by a lake in Northern Illinois. I frequent flea markets and antique shops looking for do-dads that I can sew on to my stitching projects. I offer some of my handmade items, along with my mom's and my sister's, in my Etsy shop. I enjoy baking and share many of my recipes here. And did I mention glitter?

Copyright © 2005 - 2012 - All Rights Reserved - Pamela Kellogg of Kitty & Me Designs .

Please visit her Kitty & Me Designs blog at http://kittyandmedesigns.blogspot.com/ and her Kitty & Me Designs Etsy shop at http://www.etsy.com/shop/kittyandme.

Pam's Peacock Tutorial For Crazy Quilting By Pamela Kellogg of Kitty and Me Designs

I can sit for hours and hours just looking at all the amazing creatures that crazy quilter's like to include in their designs.  One such creature is a peacock.  I have always wanted to learn how to embroider one so I was pleased to see that Pamela Kellogg has a tutorial on her Kitty & Me Designs blog showing you how to embroider an exquisite peacock.  Now that I know how to do this I'm definitely going to be trying this.  How about you?

Pam's Peacock Tutorial For Crazy Quilting

Copyright © 2010 - All Rights Reserved - Written by Pamela Kellogg of Kitty & Me Designs.

Here's what Pamela had to say about her tutorial:  Hello everyone! As promised, I've put together the tutorial for the peacock that I use on my crazy quilts. Peacocks were a very popular motif with the Victorians. They loved anything exotic! I've seen photos of Victorian crazy quilts with embroidered peacocks, satin stitched peacocks, cross stitched peacocks and painted peacocks! I myself have even used real peacock feathers on my crazy quilts.

This particular project is my own original design. I own the copyright! Please do not sell the pattern or the instructions. You may of course post a link on your blog or website to this tutorial. All I ask is that you give me credit as the designer.

I've taken a lot of photos to make it easy to understand so here goes!


Please respect Pamela's TERMS OF USE:  I like to share Craft and Embroidery Tutorials on how I do a variety of projects and techniques and helpful hints. I add to this list regularly. Please feel free to download the directions and if you try them, please let me know if you enjoyed the project!

Pamela's Bio:Designer, Textile Artist and Instructor. Although I love all forms of needlework and embroidery, my true passion is Crazy Quilting. I enjoy a quiet life in our little cottage by a lake in Northern Illinois. I frequent flea markets and antique shops looking for do-dads that I can sew on to my stitching projects. I offer some of my handmade items, along with my mom's and my sister's, in my Etsy shop. I enjoy baking and share many of my recipes here. And did I mention glitter?

Copyright © 2005 - 2012 - All Rights Reserved - Pamela Kellogg of Kitty & Me Designs .

Please visit her Kitty & Me Designs blog at http://kittyandmedesigns.blogspot.com/ and her Kitty & Me Designs Etsy shop at http://www.etsy.com/shop/kittyandme.

Glittered Fabric Leaves Free Tutorial Tutorial By Pamela Kellogg of Kitty and Me Designs

There's just something about all the sparkle and glitter associated with crazy quilt creations.  They just always seem to shine.  Well, there's a trick there - it's called glitter.   If you love glittery leaves and want to learn how to make them you'll be pleased to know that Pamela Kellogg has a tutorial on her Kitty & Me Designs blog showing you how.  Enjoy!

Glittered Fabric Leaves Tutorial Tutorial

Copyright © 2010 - All Rights Reserved - Written by Pamela Kellogg of Kitty & Me Designs.

Here's what Pamela had to say about her tutorial:  I'll be finishing up on this today. I have some of my great-aunts knitting needles and I'm planning on using one for the hanger.

If you click on the image, you can see a larger version at my Flickr site. I made glittered leaves from Sparkle Organza. I thought I'd write up a quick tutorial for you in case anyone else wants to do this.

Ok, so it's not rocket science, but if you're a perfectionist like me and come from the "old school" of sewing, like me, you might be a little intimidated about putting glue and glitter on fabric. It took me a long time to "get past the rules".


Please respect Pamela's TERMS OF USE:  I like to share Craft and Embroidery Tutorials on how I do a variety of projects and techniques and helpful hints. I add to this list regularly. Please feel free to download the directions and if you try them, please let me know if you enjoyed the project!

Pamela's Bio:Designer, Textile Artist and Instructor. Although I love all forms of needlework and embroidery, my true passion is Crazy Quilting. I enjoy a quiet life in our little cottage by a lake in Northern Illinois. I frequent flea markets and antique shops looking for do-dads that I can sew on to my stitching projects. I offer some of my handmade items, along with my mom's and my sister's, in my Etsy shop. I enjoy baking and share many of my recipes here. And did I mention glitter?

Copyright © 2005 - 2012 - All Rights Reserved - Pamela Kellogg of Kitty & Me Designs .

Please visit her Kitty & Me Designs blog at http://kittyandmedesigns.blogspot.com/ and her Kitty & Me Designs Etsy shop at http://www.etsy.com/shop/kittyandme.


Creating Backgrounds and Embellishments Using Paper Clay and Rubber Stamps Free Tutorial By Laura Carson of Artfully Musing Blog

Have you always wanted to work with paper clay and create all sorts of amazing creations?  If you have then you'll be happy to know that Laura Carson has a wonderful tutorial on her Artfully Musing blog showing you how to create amazing backgrounds and embellishments using paper clay and rubber stamps.  This is another tutorial of Laura's that I absolutely must try.  How about you?


Copyright © 2011 - All Rights Reserved - Written by Laura Carson of Artfully Musing.

Here's what Laura had to say about her tutorial:  Stamping in paper clay is a great way of creating all kinds of dimensional embellishments and backgrounds and gives you another way to use your stamps. The background of the collage piece below is paper clay that has been pressed with a rubber stamp and painted with alcohol inks. In this tutorial I’ll take you through the steps of creating backgrounds and other embellishments using paper clay and rubber stamps

Please respect Laura's TERMS OF USE:  My tutorials are protected by U.S. & International copyright laws.  Do not copy, duplicate, alter or reproduce in anyway.  Please use for inspiration only. ALL NAMES, LOGOS AND DESIGNS ARE THE PROPERTY OF THEIR RESPECTIVE OWNERS. ©2012 Laura Carson (Artfully Musing), All Rights Reserved

Laura's Bio: After retiring from the computer software industry where I spent my career designing, building and marketing software, I needed a creative outlet. A few years ago I discovered Mixed Media Art and have had a love affair ever since. I’ve taught classes in Altered Books, Handmade Books, Collage Art and Mix Media Art. I currently design for Alpha Stamps and I enjoy trading in various art groups. Starting this blog is a way of sharing my art and the wonderful art I have received from others. I specialize in very detailed multi-layered and textured pieces. I live in Anthem Arizona with my husband Kevin, dog Sandy, and cat Tigger.

Copyright © 2011 - All Rights Reserved - Laura Carson of Artfully Musing.

Please visit her Artfully Musing blog at  http://artfullymusing.blogspot.com/.


Cellphone Pouch Finishing Free Tutorial By Pamela Kellogg of Kitty and Me Designs

One of the trickier things to do in crazy quilting is figuring out how to finish your creation. If you've ever wrestled with that idea like I have you'll be please to know that Pamela Kellogg has a tutorial on her Kitty & Me Designs blog showing you how to finish a cellphone pouch. I hope you enjoy Pam's tutorial.

Cellphone Pouch Finishing Tutorial

Copyright © 2007 - All Rights Reserved - Written by Pamela Kellogg of Kitty & Me Designs.

Here's what Pamela had to say about her tutorial:  I was asked for directions on how to finish things like cellphone pouches, purses and so on.

I did the finishing on my Ocean Garden Cellphone Pouch so I thought now would be a good time to give you the tutorial. It's very easy!!!


Please respect Pamela's TERMS OF USE:  I like to share Craft and Embroidery Tutorials on how I do a variety of projects and techniques and helpful hints. I add to this list regularly. Please feel free to download the directions and if you try them, please let me know if you enjoyed the project!

Pamela's Bio:Designer, Textile Artist and Instructor. Although I love all forms of needlework and embroidery, my true passion is Crazy Quilting. I enjoy a quiet life in our little cottage by a lake in Northern Illinois. I frequent flea markets and antique shops looking for do-dads that I can sew on to my stitching projects. I offer some of my handmade items, along with my mom's and my sister's, in my Etsy shop. I enjoy baking and share many of my recipes here. And did I mention glitter?

Copyright © 2005 - 2012 - All Rights Reserved - Pamela Kellogg of Kitty & Me Designs .

Please visit her Kitty & Me Designs blog at http://kittyandmedesigns.blogspot.com/ and her Kitty & Me Designs Etsy shop at http://www.etsy.com/shop/kittyandme.


Flower Tutorial By Thespoena McLaughlin of Vintiquities Workshop

I know that I'm mentioned a thousand times that you can never have enough flowers. Or, flower tutorials.  Especially if they're being taught by a master at mixed media. If I've piqued your curiosity check out the flower tutorial that Thespa McLaughlin has on her of Vintiquities Workshop. They're just beautiful.

A free Flower Tutorial...

Copyright © 2012 - All Rights Reserved - Written by Thespoena McLaughlin of Vintiquities Workshop.

Here's what Thespa had to say about her tutorial:  I was working on some flowers this weekend and I thought I would show you a step by step on how I made them...

Please respect Thespa's TERM OF USE: My patterns & tutorials are for personal use ONLY. Not for resale. If you want to share it online please give full credit complete with a link to Vintiquities Workshop at http://vintiquitiesworkshop.blogspot.com .

Thespa's Bio: I am a mixed media artist living with my family in the Ozarks. I love aged turquoise, faded cream, and lots of romantic layers. I dig rusty things and found objects and frequently use them in my art.

Copyright © 2012 - All Rights Reserved - Thespoena McLaughlin of Vintiquities Workshop.

Please visit her Vintiquities Workshop at http://vintiquitiesworkshop.blogspot.com/.  You can also follow her on Pinterest here.


Crazy Quilt Spider Web Free Tutorial By Pamela Kellogg of Kitty and Me Designs

Now that you know how to embroider a spider you have to learn how to embroider the spider's web. What's a spider without a spider's web?  Right? Well, Pamela Kellogg has a tutorial on her Kitty & Me Designs blog showing you how to embroider a spider's web. I just love creating them and hope you do, too.

Crazy Quilt Spider Web Tutorial
and Embroidered Spider Webs With Kreinik Metallics

Copyright © 2010 - All Rights Reserved - Written by Pamela Kellogg of Kitty & Me Designs.

Here's what Pamela had to say about her tutorial: I was recently asked why I use spiderwebs on so many of my crazy quilt pieces. Well, the Victorians used spiderwebs quite often on their quilts. The Victorians loved anything exotic and ornate! They had a great love for nature. Not only that, they considered spiders in their homes to be a sign of good luck.

Back to the reason that I use them on my crazy quilts so often is that many of mine have a garden theme to them. Spider webs seem to work well for me. And I really love doing them!!

If you look closely at real spider webs, they're mini works of art! Each is unique, no two are alike and they are perfectly imperfect:


Please respect Pamela's TERMS OF USE:  I like to share Craft and Embroidery Tutorials on how I do a variety of projects and techniques and helpful hints. I add to this list regularly. Please feel free to download the directions and if you try them, please let me know if you enjoyed the project!

Pamela's Bio:Designer, Textile Artist and Instructor. Although I love all forms of needlework and embroidery, my true passion is Crazy Quilting. I enjoy a quiet life in our little cottage by a lake in Northern Illinois. I frequent flea markets and antique shops looking for do-dads that I can sew on to my stitching projects. I offer some of my handmade items, along with my mom's and my sister's, in my Etsy shop. I enjoy baking and share many of my recipes here. And did I mention glitter?

Copyright © 2005 - 2012 - All Rights Reserved - Pamela Kellogg of Kitty & Me Designs .

Please visit her Kitty & Me Designs blog at http://kittyandmedesigns.blogspot.com/ and her Kitty & Me Designs Etsy shop at http://www.etsy.com/shop/kittyandme.


Bead and Button Spider Free Tutorial By Pamela Kellogg of Kitty and Me Designs

One of the most common insects to create in crazy quilting is an adorable little spider. If you look closely at different crazy quilting designs you can see then hidden there. If you love the spiders and want to learn how to make them you'll be pleased to know that Pamela Kellogg has a tutorial on her Kitty & Me Designs blog showing you how to sew a spider. I just love creating them and hope you do, too.

Bead and Button Spider Tutorial

Copyright © 2010 - All Rights Reserved - Written by Pamela Kellogg of Kitty & Me Designs.

Here's what Pamela had to say about her tutorial:  When I wrote the tutorial for how to do embroidered spider webs, I promised I would explain how to make the spiders in my next post. So here it is!

They're actually quite easy to do.


Please respect Pamela's TERMS OF USE:  I like to share Craft and Embroidery Tutorials on how I do a variety of projects and techniques and helpful hints. I add to this list regularly. Please feel free to download the directions and if you try them, please let me know if you enjoyed the project!

Pamela's Bio:Designer, Textile Artist and Instructor. Although I love all forms of needlework and embroidery, my true passion is Crazy Quilting. I enjoy a quiet life in our little cottage by a lake in Northern Illinois. I frequent flea markets and antique shops looking for do-dads that I can sew on to my stitching projects. I offer some of my handmade items, along with my mom's and my sister's, in my Etsy shop. I enjoy baking and share many of my recipes here. And did I mention glitter?

Copyright © 2005 - 2012 - All Rights Reserved - Pamela Kellogg of Kitty & Me Designs .

Please visit her Kitty & Me Designs blog at http://kittyandmedesigns.blogspot.com/ and her Kitty & Me Designs Etsy shop at http://www.etsy.com/shop/kittyandme.

A Free Tutorial For Finishing Ornaments By Romona King Of Northbrook Designs

I am always looking for ways to finish my cross-stitch ornaments and creations.  If you are, too then you'll be pleased to know that Romona King of Northbrook Designs has created another wonderful FREE .pdf tutorial on her Northbrook Stitches blog showing you how to finish all her wonderful cross-stitch designs.


A Tutorial for Finishing Ornaments
© 2012 by Romona King of Northbrook Designs

If you'd like to download Romona's tutorial please click on the picture above or CLICK HERE TO DOWNLOAD

Here's what Romona had to say about her tutorial:  These instructions are generic for any ornaments made from my free cross stitch designs. All you need to do is change the shape of the ornament to suit your needs. My ornament shapes are usually oval, but whatever shape you prefer, you can easily adapt for yours..

Please respect Romona's Terms of UseThis tutorial is offered freely for  your enjoyment.  Please respect the designers work and give credit where due. Thank you, Romona.

Copyright © 2012 - All Rights Reserved — Written By Romona King of Northbrook Designs. Romona is a crafter, doll maker, painter, needlework artist, and mixed media artist. You can visit her Northbrook Designs blog online at http://northbrookdesigns.blogspot.com/ and her Northbrook Stitches blog at http://www.northbrookstitches.blogspot.com/. You can also visit her Northbrook Designs shop at http://www.northbrookdesigns.com/.


18th Century Scissor Shoe Fobs Cross-Stitch Free Tutorial By Romona King Of Northbrook Designs

I just LOVE cross-stitch and LOVE shoes so you can imagine how delighted I was to see that Romona King of Northbrook Designs had created 3 wonderful free cross-stitch designs on her Northbrook Stitches blog for creating 18th century scissor shoe fobs.  I am definitely going to be creating some of these.


18th Century Scissor Shoe Fobs
© 2012 by Romona King of Northbrook Designs

If you'd like to download Romona's cross-stitch designs and tutorial please click on the picture above or CLICK HERE TO DOWNLOAD

Here's what Romona had to say about her cross-stitch designs and tutorial:  Shoe Fobs came about as a result of my friend Colleen asking if I would like to be a guest blogger on her site. Because I had just recently gone back in time a little to return to my needlework days, she wondered if I could come up with something to celebrate her Historical theme for March 2012. I decided these were simple and quick to do and in keeping with my Marie Antoinette obsession. I have tried to use as few colours as possible because I tend to get carried away with details, so I have restrained myself for these fobs.

These are very small, they fit onto a 1 1/4 th  metal button cover. I have written a tutorial below to show you how to put these little charmers together. They make wonderful decoration and identifiers for your scissors and we all know how special our scissors are to us. They are fast to do and you can make them to fit larger or smaller button covers by simply changing your fabric count therefore making them for your different sizes of scissors.

Please respect Romona's Terms of Use - This design is offered freely, please respect the designers work and give credit where due. You may use the design to create projects to sell but not for mass production.

Copyright © 2012 - All Rights Reserved — Written By Romona King of Northbrook Designs. Romona is a crafter, doll maker, painter, needlework artist, and mixed media artist. You can visit her Northbrook Designs blog online at http://northbrookdesigns.blogspot.com/ and her Northbrook Stitches blog at http://www.northbrookstitches.blogspot.com/. You can also visit her Northbrook Designs shop at http://www.northbrookdesigns.com/.

Bethany Cross-Stitch Free Design By Romona King Of Northbrook Designs

If you LOVE cross-stitch like I do you'll be happy to know that Romona King has a wonderful free cross-stitch design on her Northbrook Stitches blog based upon her beautiful Bethany doll.  Enjoy!  I know that I will.

Bethany
© 2012 by Romona King of Northbrook Designs

If you'd like to download Romona's cross-stitch design please click on the picture above or CLICK HERE TO DOWNLOAD

Here's what Romona had to say about her cross-stitch design:  These instructions are generic for any ornaments made from my free cross stitch designs. All you need to do is change the shape of the ornament to suit your needs. My ornament shapes are usually oval, but whatever shape you prefer, you can easily adapt for yours.

Please respect Romona's Terms of Use - This design is offered freely, please respect the designers work and give credit where due. You may use the design to create projects to sell but not for mass production.

Copyright © 2012 - All Rights Reserved — Written By Romona King of Northbrook Designs. Romona is a crafter, doll maker, painter, needlework artist, and mixed media artist. You can visit her Northbrook Designs blog online at http://northbrookdesigns.blogspot.com/ and her Northbrook Stitches blog at http://www.northbrookstitches.blogspot.com/. You can also visit her Northbrook Designs shop at http://www.northbrookdesigns.com/.

Holiday Hair Band and Jeweled Gloves Free Tutorials by Alisa Burke

It's always fun around the holidays to dress up and be festive. Especially when you're wearing something handmade and unique.  Here's a few festive suggestions from Alisa Burke.

Copyright © 2010 - All Rights Reserved - Written by Alisa Burke of Alisa Burke

Here's what Alisa had to say about her tutorial: Tis the season for holiday parties and events and if you are like me that means pulling together last minute outfits and holiday accessories (that do not include yoga pants and paint stained t-shirts)! Why not make your own hair accessories to top off a festive outfit. An easy option is to take a little time to make your own holiday hair band- super simple to make and costs next to NOTHING!


Copyright © 2010 - All Rights Reserved - Written by Alisa Burke of Alisa Burke

Here's what Alisa had to say about her tutorial: I am noticing a trend this winter- jeweled gloves.

Please respect Alisa's TERMS OF USE:  I work really hard to come up with my art, tutorials, ideas, classes, inspiration and more. Please understand that everything I post on my blog is for your personal use only - not for resale or redistribution. Please contact me if you are interested in using anything that I share online-thank you!!!

For more information on Alisa's Terms of Use please CLICK HERE.

Alisa's Bio: Alisa Burke is a freelance painter and mixed media artist who studied fine art at Portland State University. With a background in painting and printmaking, a desire to explore and push materials, Alisa is always looking for new ways to break the rules and redefine art. She draws inspiration from street art, graffiti, art history and fashion and it is not uncommon to find her digging through the trash in hopes of recycling something unique use in her artwork.

Alisa’s paintings have been exhibited in a variety of galleries and her handmade, painted accessories are carried in a number of boutiques across the country. Her artwork has been featured in publications such as Cloth Paper Scissors, Quilting Arts, Where Women Create, Somerset Studios’ Haute Handbags, Art Doll Quarterly, and the University of San Diego Magazine. In addition to making art, Alisa teaches a variety of workshops nation wide. Alisa appeared as a guest artist on the DIY Network show Craft Lab and book Canvas Remix was released in spring 2008.

Copyright © 2010 - All Rights Reserved - Alisa Burke of Alisa Burke.

Please visit her Alisa Burke website at http://www.alisaburke.com and her Alisa Burke - Redefine Creativity blog at http://www.alisaburke.blogspot.com. Her Alisa Burke Etsy shop is at http://alisaburke.etsy.com.


Embellished Socks and Whimsical Felt Slippers Free Tutorials by Alisa Burke

Have you ever wanted to just have a little fun with your clothing or be a little whimsical? I know that I have. Well, Alisa Burke has two adorable tutorials showing you how to embellish your socks and how to make whimsical felt slippers. Have fun!

Copyright © 2011 - All Rights Reserved - Written by Alisa Burke of Alisa Burke

Here's what Alisa had to say about her tutorial: I have a bit of an obsession with boots- short, tall, vintage, black, brown- I just can't seem to get enough of them! And when you have a huge boot collection you gotta have cute socks to wear.


Copyright © 2010 - All Rights Reserved - Written by Alisa Burke of Alisa Burke

Here's what Alisa had to say about her tutorial: Now that fall is here, I wake up every morning with cold toes- yes, even in Southern California. For a while I've been wanting to try making my own slippers with a fun and whimsical twist and my icy toes were the perfect excuse. This project could be altered and adapted in so many different ways and would be a great little handmade gift for the holidays.

Please respect Alisa's TERMS OF USE:  I work really hard to come up with my art, tutorials, ideas, classes, inspiration and more. Please understand that everything I post on my blog is for your personal use only - not for resale or redistribution. Please contact me if you are interested in using anything that I share online-thank you!!!

For more information on Alisa's Terms of Use please CLICK HERE.

Alisa's Bio: Alisa Burke is a freelance painter and mixed media artist who studied fine art at Portland State University. With a background in painting and printmaking, a desire to explore and push materials, Alisa is always looking for new ways to break the rules and redefine art. She draws inspiration from street art, graffiti, art history and fashion and it is not uncommon to find her digging through the trash in hopes of recycling something unique use in her artwork.

Alisa’s paintings have been exhibited in a variety of galleries and her handmade, painted accessories are carried in a number of boutiques across the country. Her artwork has been featured in publications such as Cloth Paper Scissors, Quilting Arts, Where Women Create, Somerset Studios’ Haute Handbags, Art Doll Quarterly, and the University of San Diego Magazine. In addition to making art, Alisa teaches a variety of workshops nation wide. Alisa appeared as a guest artist on the DIY Network show Craft Lab and book Canvas Remix was released in spring 2008.

Copyright © 2010 - All Rights Reserved - Alisa Burke of Alisa Burke.

Please visit her Alisa Burke website at http://www.alisaburke.com and her Alisa Burke - Redefine Creativity blog at http://www.alisaburke.blogspot.com. Her Alisa Burke Etsy shop is at http://alisaburke.etsy.com.


Powered by Blogger.