Pocketed Notebook Cover Free Tutorial By Vicki Welsh of Field Trips In Fiber

If you're thinking of making a notebook cover, notepad cover, or Blackberry cover then you'll be happy to know that Vicki Welsh of Field Trips In Fiber has a wonderful tutorial on her blog showing you how to make a pocketed notebook cover.   I hope you enjoy Vicki's tutorial.


Copyright © 2010- All Rights Reserved - Written By Vicki Welsh of Field Trips In Fiber.

Here's what Vicki had to say about her pocketed notebook cover: Last month I made one of these pocketed notebook covers for my friend, Anne. It's designed for a large spiral notebook and has pockets to hold her Blackberry and some pens.

Then people saw it. Then there were demands for more covers. Being a good friend, I met the demands. I also created a tutorial that was posted to 3 Creative Studios yesterday.

I only wish I had thought of this design while I was still working and dropping my Blackberry as I moved from meeting to meeting. But now you can make them for your office mates and there's plenty of time before Christmas to make one for everyone!


Please respect Vicki's Terms of Use: Tutorial, text & images are the property of Vicki Welsh. Please do not copy or distribute in any form for any reason without my permission! Note: You can make these to sell at craft shows if you want. A friend makes them and they are big sellers for her! You may not mass produce these for commercial sale.

Vicki's Bio - I am 51, married 23 years and no kids (by choice). I live near Richmond, VA and am obsessed with anything to do with fabric and thread! I sew quilts, dye fabric, longarm quilting and just make lots of things. I started this blog as a way to chronicle my sewing goals and adventures and retired recently to become a full time fabric dyer.

Copyright © 2006-2011 - All Rights Reserved - Written By Vicki Welsh of Field Trips In Fiber - Adventures in quilting, hand dyed fabric and fiber art. Vicki is a fiber artist and fiber dyer. Please visit her "Vicki Welsh - Hand Dyed Fabrics" Etsy Shop.

Quilted Kindle Pouch Free Tutorial By Terri Stegmiller of StegArt

If you're looking for an adorable way to decorate and cover your Kindle then you'll be happy to know that Terri Stegmiller has a wonderful tutorial on her Terri Stegmiller website showing you how to make a quilted Kindle pouch. I hope you enjoy Terri's tutorial.


Quilted Kindle Pouch
Copyright © 2010 - All Rights Reserved - Written By Terri Stegmiller 


Here's what Terri had to say about her quilted Kindle pouch tutorial: I recently got a Kindle and I love it. The Kindle is a wireless reading device available through Amazon.com. It’s a great item if you enjoy reading, which I do. There are times when I’d like to take my Kindle along with me when I’m running errands. You never know when you might have to sit somewhere and wait for someone or something and it would be nice to have some reading material. The Kindle is a nice size to take along with me where ever I go. But I don’t like the idea of just putting it in my handbag, unprotected. I don’t want the screen to get scratched or damaged from other items in my purse or bag. So I decided to create a pouch to protect my Kindle.

These pouches make great gifts and they don’t have to be used for a Kindle. The pouches in this tutorial will hold the Kindle (Wi-Fi) and the Kindle (3G & Wi-Fi). If your wireless reading device has different dimensions than these Kindle devices, then you will need to alter the pouch dimensions.


Please respect Terri's Terms of Use: Tutorial, text & images are the property of Terri Stegmiller. Do not copy or distribute in any form for any reason without my permission!

Terri's Bio - After a lifetime of experimenting with all types of crafts, Terri began exploring quilting in the early 1990’s. She discovered pretty quickly that traditional and bed-sized quilts were not quite her style and began experimenting with mixed media and creating her own designs. Known for her innovative combination's of color and pattern she is inspired by nature, cats and the female face and enjoys creating artwork that incorporate these elements. When she is not creating art, Terri also enjoys web site design and graphic design work. Terri is the author of Creative Paper Quilts, co-author of Creative Ways with Fiber and Stitch, sells her art through her website at www.terristegmiller.com/.

Copyright © 2010 - All Rights Reserved - Written By Terri Stegmiller of Terri Stegmiller .

Please visit Terri's Terri Stegmiller  website, her StegArt Etsy Shoppe, and her Terri Stegmiller blog.

How To Make A Fabric Covered Round Basket Free E-Book From Linda Walsh of Linda Walsh Originals

Since I had just finished my Linda's Blog post on all the fabric covered baskets I had made I thought you might enjoy a step-by-step "How-to" on how to make one of your own. If you'd like to read my post entitled "During Another Craft Phase - Fabric Covered Baskets" please CLICK HERE.


My instructions on how to make a fabric covered basket of your own are shown below.

I also created a .PDF "Linda's How-Do-I Series How To Make A Fabric Covered Round Basket" e-book for this as well.

If you'd like to download my free e-book please CLICK HERE for the "How To Make A Fabric Covered Round Basket" e-book page of my Linda Walsh Originals E-Patterns website. Here you can download my free e-book and and view all of our e-patterns and e-books.

How To Make A Fabric Covered Round Basket

Supplies Needed

1 Small Round Basket With Handle - 3" Round
1/4 Yard Fabric - 36" Wide
1" Lace Trim - 16" Long
DMC Embroidery Floss
Sewing Thread
Dual Temperature Glue Gun
Glue Sticks
Measuring Tape
Large Plain Piece Of Paper
Iron

Instructions

(Note - These instructions are for ADULT use only as they require the use of a hot glue gun.  Always use caution when working with any kind of hot glue gun.)

1.   Measure the width of your basket and then measure the height of your basket from the bottom of the basket to the top of the rim.  Multiply the height of your basket times 2 and then add this to the width of your basket.
2.   Follow the diagram shown below and draw a circle the width + height  X2 of your basket on a large plain piece of paper.  Draw a circle around your initial circle another 1/2" around for your seam allowance and gathering of your fabric.  Now, to this adjusted circle you have just drawn add another 3/4" around for the ruffle.


3.   Cut 2 pieces of fabric for your lining and basket cover according to the final circle pattern you have just drawn.
4.   Measure the length of the handle of your basket from the bottom of the handle starting on the left hand side of the basket to the bottom of the handle on the right hand side of the basket and add 3/4" - this is your adjusted handle length.  Measure the circumference of the handle and add 3/4" - this is your adjusted handle width.
5.   Cut a rectangular strip of fabric the adjusted length of your handle by the adjusted width of your handle.
6.   With wrong sides together (WST) turn both edges of your adjusted handle length under 1/4" and press. 
7.   With wrong sides together (WST) turn both edges of your adjusted handle width under 1/4" and press.
8.   Wrap the handle fabric around the handle overlapping the pressed under edges until the handle fabric is tight to and completely covers the handle.  Hand sew the overlap closed.  Position the handle fabric so the hand sewn seam is on the underside of the handle.
9.   Cut a slit in the center of your lining for the width plus height of the basket X2.
10. Cut a piece of the 1" lace trim to match the circumference of the circle plus 1/2" for an overlap.
11. With right sides together (RST) position the lace trim on the edge of the basket cover so the finished edge is facing towards the inside of the circle and the edges are overlapping.  Then stitch the lace trim to the edge of the basket cover using a 1/4" seam allowance.
12. With right side together (RST) sew the lining to the basket cover using a 1/4" seam allowance.
13. Turn the lining and basket cover right sides out (RST).
14. Insert the basket through the slit in the lining and pull the basket cover up until the bottom and sides are tight.
15. Turn the sides of the slit under 1/4" and then pull the lining up and around the bottom of the handles until they are completed covered.  Overlap the turned under edges of the slit and then hand sew the slit closed.
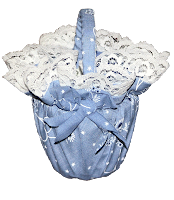
16. Sew a gathering stitch 3/4" down from the edge of the cover with the DMC embroidery floss.  Pull tightly to gather and then knot to secure.  The gathering should be slightly over the rim of the basket as shown in the picture below.


17. Position the ruffle so it is facing upwards against the sides of the handle and then using the low temperature setting of the dual temperature glue gun glue the sides of the ruffle to the handles like those shown in the picture below.


18. Cut 4 strips of fabric 1/2" wide by 8" long and tie into 2" wide bows.  Trim the ends and then glue two bows (one on top of the other) to the sides of the baskets using the low temperature setting of the dual temperature glue gun like those shown in the picture above.
19. Congratulations - You're Done!

Please respect Linda's Terms of Use: All patterns, e-patterns, e-books, tutorials, how-to's, and e-products © 2004-2010 Linda Walsh Originals-Designs by Linda Walsh. All rights reserved, including downloading, mass producing, photocopying, enlargements, reductions,and all other forms of reproduction, website sharing, Email, RSS feeds, or any other means of redistribution. Commercial selling or reselling by any means, including eBay or any other website by permission only.

Products made from Linda Walsh Originals patterns, e-patterns, e-books, tutorials, how-to's, and e-products are intended for personal use for fun or small scale personal and business profit as long as you credit us with the design. Large scale commercial use (i.e. mass production) including wholesale distribution, catalog sales, and all other forms of large scale commercial production are by permission only. Items made from Linda Walsh Originals patterns, e-patterns, e-books, tutorials, how-to's, and e-products are intended for decoration only and are not intended for use by children. Not responsible for human error, individual workmanship, or printing errors in the E-books, E-products, tutorials, how-to's, patterns or the E-Patterns.


Copyright © 2010 - All Rights Reserved - Written By Linda Walsh of Linda Walsh Originals, Linda Walsh Originals E-Patterns, and Linda's Blog. Linda is a doll maker and doll pattern designer. http://lindawalshoriginals.com/
Powered by Blogger.