My instructions on how to make a fabric covered basket of your own are shown below.
I also created a .PDF "Linda's How-Do-I Series How To Make A Fabric Covered Round Basket" e-book for this as well.
If you'd like to download my free e-book please CLICK HERE for the "How To Make A Fabric Covered Round Basket" e-book page of my Linda Walsh Originals E-Patterns website. Here you can download my free e-book and and view all of our e-patterns and e-books.
How To Make A Fabric Covered Round Basket
Supplies Needed
1 Small Round Basket With Handle - 3" Round
1/4 Yard Fabric - 36" Wide
1" Lace Trim - 16" Long
DMC Embroidery Floss
Sewing Thread
Dual Temperature Glue Gun
Glue Sticks
Measuring Tape
Large Plain Piece Of Paper
Iron
Instructions
(Note - These instructions are for ADULT use only as they require the use of a hot glue gun. Always use caution when working with any kind of hot glue gun.)
1. Measure the width of your basket and then measure the height of your basket from the bottom of the basket to the top of the rim. Multiply the height of your basket times 2 and then add this to the width of your basket.
2. Follow the diagram shown below and draw a circle the width + height X2 of your basket on a large plain piece of paper. Draw a circle around your initial circle another 1/2" around for your seam allowance and gathering of your fabric. Now, to this adjusted circle you have just drawn add another 3/4" around for the ruffle.

3. Cut 2 pieces of fabric for your lining and basket cover according to the final circle pattern you have just drawn.
4. Measure the length of the handle of your basket from the bottom of the handle starting on the left hand side of the basket to the bottom of the handle on the right hand side of the basket and add 3/4" - this is your adjusted handle length. Measure the circumference of the handle and add 3/4" - this is your adjusted handle width.
5. Cut a rectangular strip of fabric the adjusted length of your handle by the adjusted width of your handle.
6. With wrong sides together (WST) turn both edges of your adjusted handle length under 1/4" and press.
7. With wrong sides together (WST) turn both edges of your adjusted handle width under 1/4" and press.
8. Wrap the handle fabric around the handle overlapping the pressed under edges until the handle fabric is tight to and completely covers the handle. Hand sew the overlap closed. Position the handle fabric so the hand sewn seam is on the underside of the handle.
9. Cut a slit in the center of your lining for the width plus height of the basket X2.
10. Cut a piece of the 1" lace trim to match the circumference of the circle plus 1/2" for an overlap.
11. With right sides together (RST) position the lace trim on the edge of the basket cover so the finished edge is facing towards the inside of the circle and the edges are overlapping. Then stitch the lace trim to the edge of the basket cover using a 1/4" seam allowance.
12. With right side together (RST) sew the lining to the basket cover using a 1/4" seam allowance.
13. Turn the lining and basket cover right sides out (RST).
14. Insert the basket through the slit in the lining and pull the basket cover up until the bottom and sides are tight.
15. Turn the sides of the slit under 1/4" and then pull the lining up and around the bottom of the handles until they are completed covered. Overlap the turned under edges of the slit and then hand sew the slit closed.
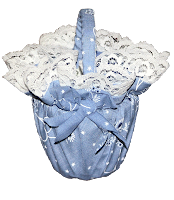
16. Sew a gathering stitch 3/4" down from the edge of the cover with the DMC embroidery floss. Pull tightly to gather and then knot to secure. The gathering should be slightly over the rim of the basket as shown in the picture below.

17. Position the ruffle so it is facing upwards against the sides of the handle and then using the low temperature setting of the dual temperature glue gun glue the sides of the ruffle to the handles like those shown in the picture below.

18. Cut 4 strips of fabric 1/2" wide by 8" long and tie into 2" wide bows. Trim the ends and then glue two bows (one on top of the other) to the sides of the baskets using the low temperature setting of the dual temperature glue gun like those shown in the picture above.
19. Congratulations - You're Done!
Please respect Linda's Terms of Use: All patterns, e-patterns, e-books, tutorials, how-to's, and e-products © 2004-2010 Linda Walsh Originals-Designs by Linda Walsh. All rights reserved, including downloading, mass producing, photocopying, enlargements, reductions,and all other forms of reproduction, website sharing, Email, RSS feeds, or any other means of redistribution. Commercial selling or reselling by any means, including eBay or any other website by permission only.
Products made from Linda Walsh Originals patterns, e-patterns, e-books, tutorials, how-to's, and e-products are intended for personal use for fun or small scale personal and business profit as long as you credit us with the design. Large scale commercial use (i.e. mass production) including wholesale distribution, catalog sales, and all other forms of large scale commercial production are by permission only. Items made from Linda Walsh Originals patterns, e-patterns, e-books, tutorials, how-to's, and e-products are intended for decoration only and are not intended for use by children. Not responsible for human error, individual workmanship, or printing errors in the E-books, E-products, tutorials, how-to's, patterns or the E-Patterns.
Copyright © 2010 - All Rights Reserved - Written By Linda Walsh of Linda Walsh Originals, Linda Walsh Originals E-Patterns, and Linda's Blog. Linda is a doll maker and doll pattern designer. http://lindawalshoriginals.com/

0 comments:
Post a Comment